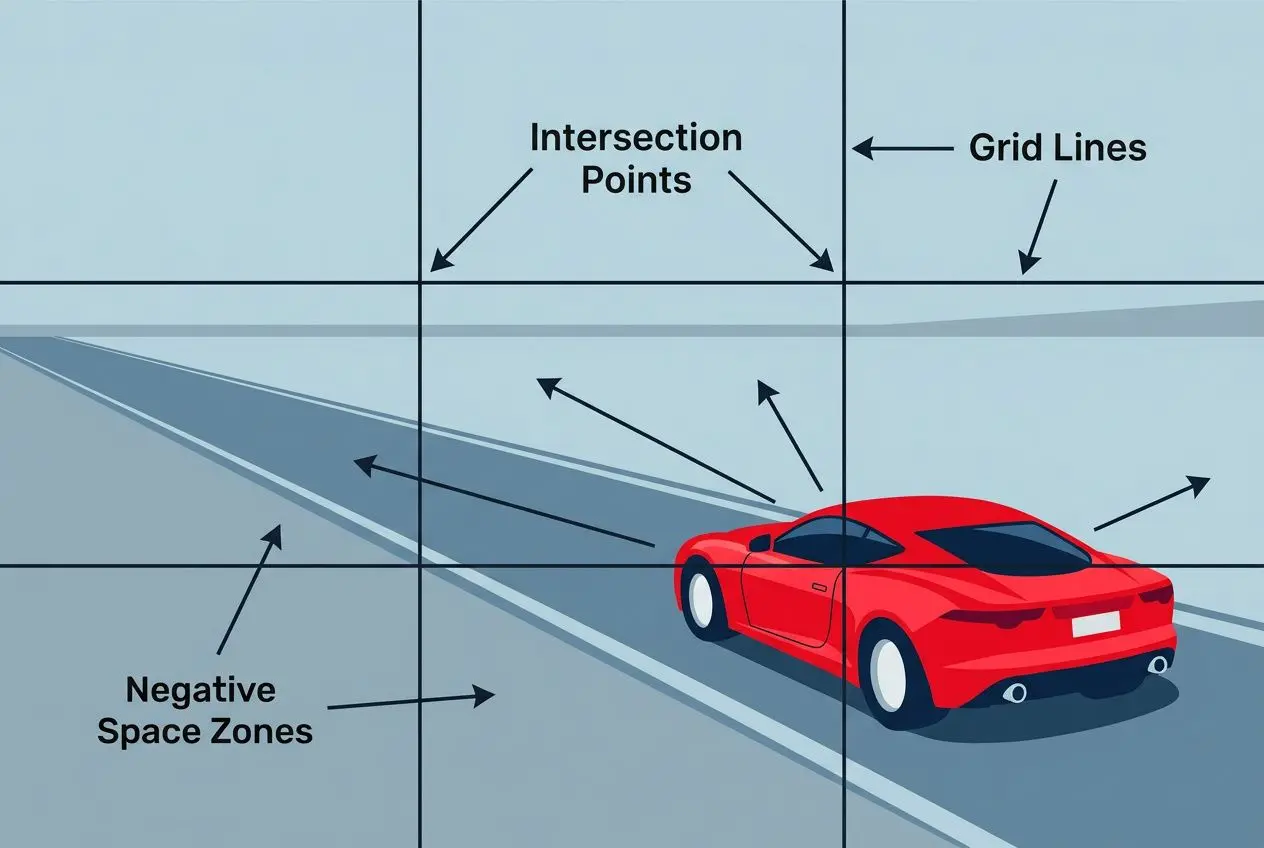
Positioning a car perfectly centered in the frame often results in a flat and static photograph. By moving your subject toward one of the grid’s four intersection points, you give the visual composition room to breathe. Applying the rule of thirds in car photography can turn an ordinary vehicle shot into something truly captivating.
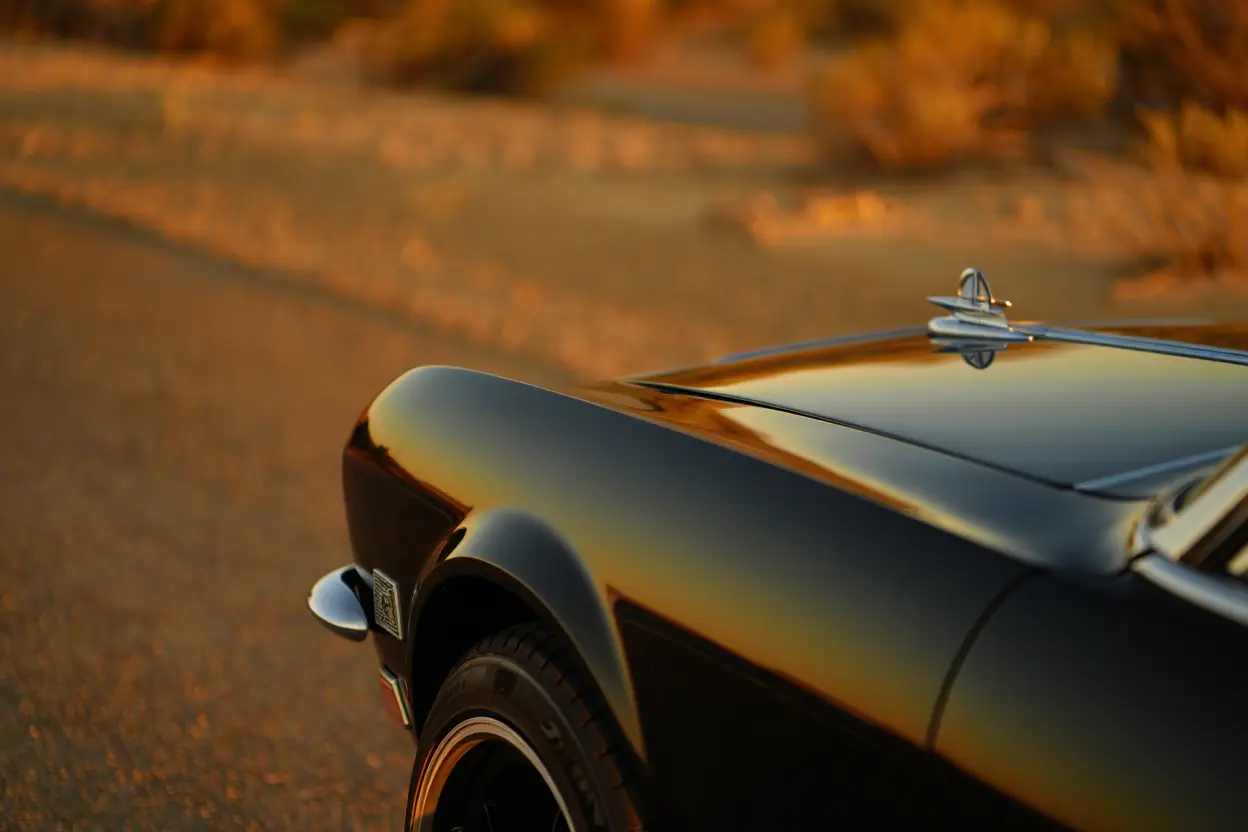
Think of an invisible line that guides you to precisely place the car, ensuring a perfect visual balance in your car photography. You can master this approach, similar to the technique seen in a fine art muscle car photography piece featuring a Ford GT40 and Mustang at Spa-Francorchamps. This particular image, available on premium aluminum or canvas, uses a square crop, selective color, and dramatic tones to create a powerful statement for collectors and interior designers.
What is the rule of thirds in car photography
The rule of thirds divides your image with two horizontal and two vertical lines—creating a 3×3 grid of nine equal rectangles. The points where these lines intersect naturally capture a viewer’s focus, making them ideal locations to anchor your car. Embracing the rule of thirds allows you to expertly balance your subject, the background, and the overall composition.
How the 3×3 grid works in your viewfinder
Activate the grid overlay built into most cameras—it’s usually found in the display settings. Once turned on, this grid serves as a brilliant visual aid, guiding you toward a more dynamic balance in your scene. It deliberately creates visual tension by directing the viewer’s attention toward the grid’s intersections rather than the predictable center.
Train your eye to mentally apply the grid, even when the overlay is hidden. Try placing a key feature—like the front of the car or a headlight—directly on one of the lines. This thoughtful approach to placing the car will noticeably elevate the professionalism of your car photography.
Why intersection points matter for vehicle composition
These four intersection points demonstrate the rule of framing photography powerfully. Positioning crucial elements—like a headlight—on one of these spots commands exactly where the viewer should look. When done well, it suggests motion and introduces a clear narrative purpose.
This off-center placement injects energy into the scene that a static, centered subject simply can’t offer. It ensures your car remains the clear subject while also carving out plenty of breathing space for the background. This thoughtful layout minimizes visual clutter and amplifies the entire scene’s impact.
The 2/3 rule in art and its role in automotive framing
The 2/3 rule in art applies directly to creating visual harmony in your frame. It suggests using roughly one-third of the frame for your primary subject—the car. The remaining two-thirds can then be dedicated to capturing the surrounding environment or background.
Placing your vehicle along a vertical line gives it generous leading space. This open area effectively guides the viewer’s eye from the subject outward, deepening the entire scene. It’s a classic composition principle—favored in both museums and galleries—for a reason.
Applying the 70 30 rule across different car shot types
Cars & Roses — Fine Art Photography
Car Photography Prints — Fine Art
Experience composition mastered in automotive fine art photography. Museum-quality prints from €78.
The 70 30 rule in art provides a practical application of the rule of thirds for any subject. Your main subject should occupy about seventy percent of the frame, with the remaining thirty percent serving as negative space. This allocation adds essential context to your scene.
Panning, corner, and motion shots with open space
When taking panning shots, position the vehicle on the vertical line opposite its direction of travel. For example, if a race car is moving left, place it on the right side—this builds dynamic visual tension by creating leading room. The 70 30 rule in art applies perfectly here, dedicating thirty percent of the image to the car to emphasize a strong sense of motion for the viewer.
- Lead room allocation: Point the car’s front bumper toward the open area. This suggests movement into the scene rather than driving toward the frame edge.
- Horizon placement: Align the horizon along the upper or lower third line. This stabilizes the image and avoids an awkward composition.
- Speed impression: Generous open space in front of the car enhances the feeling of speed. Tight framing, by contrast, makes the vehicle appear static or confined.
Corner shots work best when you position the car near grid intersection points on the inside of the turn. This approach leaves plenty of room for the curved road and background, emphasizing the car’s precision. Focus manually on the car’s side profile, then fine-tune your composition to ensure sharpness throughout.
| Shot type | Car position | Open space allocation | Horizon line |
| Panning left | Right vertical third | 70% left (direction of travel) | Upper or lower third line |
| Panning right | Left vertical third | 70% right (direction of travel) | Upper or lower third line |
| Corner shot | Grid intersection inside turn | 70% outside corner | Lower third for emphasis |
| Straightaway acceleration | Lower third with lead room forward | 70% ahead of the car | Upper third for sky dominance |
Wide establishing shots and environmental storytelling
In wide establishing shots, try placing the car and horizon along the lower third line. This allows the sky or surrounding landscape to occupy the top two-thirds, giving essential background context. Understanding what is the 70 30 rule in art helps you balance visual weight, keeping the vehicle as the main focus while surrounding it with space.
Strategic placement turns an ordinary car photo into a rich visual story. Positioning an old car on a vertical line, for example, lets the background stretch out behind it, creating a contrast between the subject and its environment that can deeply impact the viewer.
Pit lane and detail shots using power points
Pit lane shots follow similar principles—place secondary subjects, like crew members, near grid intersection points. This draws attention while preserving the garage’s atmosphere. Positioning a person thoughtfully adds visual tension, turning a standard portrait into a lively scene.
Detail shots of car components become much more engaging when composed carefully within the frame. Leaving negative space around a part lets viewers appreciate its relation to the overall machine. This subtlety elevates the image from simple documentation to visual storytelling by suggesting context without overcrowding.
- Mechanic positioning: Place the main mechanic at a grid intersection, leaving room for tools and setting the workspace scene.
- Component framing: Position an engine detail at a grid point, using negative space to reveal the surrounding chassis.
- Helmet arrangement: Align driver gear at a strong visual point, ensuring team colors and background elements remain distinct.
- Pit wall perspective: Frame strategy boards alongside team members using grid intersections rather than centering them.
Consistently applying power-point positioning reinforces your documentary style. When a viewer sees a shot where the subject aligns with the rule of thirds, they recognize intentional framing. This subtle professionalism distinguishes your work from casual snapshots.
Techniques, Post-Processing, and Knowing When to Break the Rule
Cars & Roses — Fine Art Photography
Fine Art Car Photography — Limited Edition
Museum-quality archival prints from passionate photographers — individually numbered.
Mastering the rule of thirds grid means controlling your technique at capture and fine-tuning your edit later on. You also need to recognize those moments when this composition technique should be deliberately set aside—and why. Producing high-caliber car photography demands you understand the rule so well that you can break it with clear purpose.
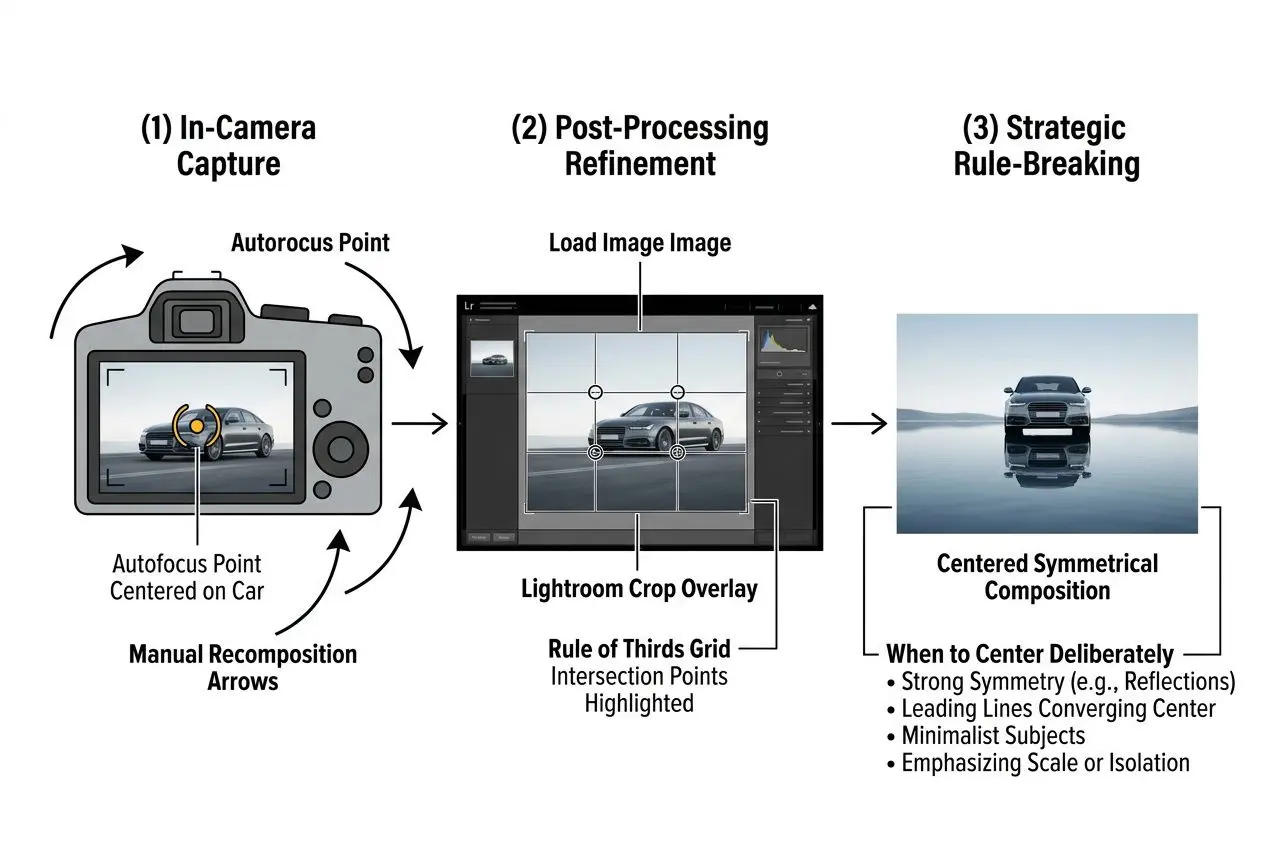
Focus Lock and Recomposition for Sharp Third-Line Placement
The focus-and-recompose approach tackles a common problem when framing a subject. It ensures critical sharpness even when your autofocus point isn’t directly on the desired grid lines. Understanding what the 80/20 rule is in art clarifies this: you get that vital twenty percent perfectly in focus before shifting the frame.
- Center autofocus first: Position the central point on your key detail—a headlight or emblem, for instance—then lock both focus and exposure.
- Reposition smoothly: Keep the shutter button half-pressed and rotate the camera to align the car along a vertical or horizontal line.
- Use manual exposure mode: Shooting in manual prevents the exposure from shifting as you move the camera away from the initial metered spot.
- Verify alignment before full release: Double-check that the vehicle sits exactly on your planned grid intersection before fully pressing the shutter.
Manual exposure is essential here—it keeps your light readings consistent even when you tilt the lens away from the background. Meter for the car, set your exposure, then recompose without worrying about the brightness shifting.
Refining Composition in Post-Processing with Crop Overlays
Editing tools like Lightroom and Photoshop feature an overlay in their crop modules. This allows you to refine your composition by aligning the vehicle with precision. The rule of thirds in art becomes especially clear during this stage—you can adjust the framing so the car occupies one third while the remaining space complements it.
- Lightroom crop overlay: Activate the grid, then drag the crop borders until the car aligns with the guides.
- Aspect ratio adjustment: Altering the aspect ratio—from 3:2 to 16:9, for example—can provide more space for elegant subject placement.
- Horizon straightening: Use the angle slider to level any horizontal lines, like a road or a horizon, with the grid.
- Power point alignment: Place important details—a badge, a wheel, or a reflection—right on a grid intersection.
Getting the shot right in-camera is always preferable to heavy cropping. Still, the editing tool serves as an excellent way to check your work. Save significant cropping for rescuing an image, as it helps preserve detail and visual strength.
When Symmetry and Creative Intent Override the Grid
Symmetrical compositions often ignore the grid intentionally—a centered position offers perfect visual balance. A dead-on front view of a race car, for instance, draws its impact from that symmetry. Breaking the rules should always be a thoughtful act, not a mistake.
Extreme close-ups on specific details usually don’t need negative space. These shots emphasize texture and shape over context, making a centered image the right call. Shoving a subject off to one side isn’t necessarily the most effective artistic move.
Frequently Asked Questions
What is the rule of thirds in car photography?
The rule of thirds is a composition tool that divides your image into a grid with two horizontal and vertical lines. This creates four intersection points that naturally draw the viewer‘s eye. In car photography, placing your main subject—like the car’s logo or headlight—on one of these points or along a line adds visual balance and interest to the frame. You can see this technique masterfully applied in our luxury car photography collection.
How do I enable the grid overlay on my camera?
Enabling the grid overlay is straightforward on most modern cameras and smartphones—you’ll typically find it in the main settings or composition menu. Turning on these vertical lines and horizontal guides helps you practice aligning your shots on the spot. It’s a fantastic tool for real-time feedback that improves your composition without affecting the final image.
Should I center my car or use the rule of thirds?
Positioning your car off-center using the rule of thirds in car photography often creates a more engaging image by introducing dynamic tension. Save the centered composition for specific scenarios, like a powerful, straight-on front shot or when working with perfect symmetry in the scene. Intentionally choosing when to place your subject on the intersection points leads to a more compelling frame than always defaulting to the middle.
Cars & Roses
Discover Our Collections
Prestige
Porsche Collection
Fine Art Prints
Automotive
Sports Cars
Fine Art Prints
Landscape
Landscapes
Fine Art Prints
Museum-quality archival prints — from €78 — worldwide shipping