09 Jun How to frame large prints: tips for perfectly framed photo prints
Choosing the right frame for large artwork
That foundation starts with the frame itself. Scale changes everything: a large print asks more of its frame, its backing, and its mounting than smaller picture frames ever do. The frame, in this sense, should define the boundary of the image without drawing the eye away from it.
Frame materials and styles that complement large art prints
For large formats, the first decision is material. Wooden frames and metal frames do not merely look different; they carry weight differently, affect the profile of the finished piece, and shape how the artwork reads on the wall. The right finish depends on the subject, the room, and the visual weight the piece should hold once framed.
- Light wooden frames: maple, pine, oak, and bamboo remain reliable choices. A wood frame in a natural tone suits many subjects and keeps the eye on the print rather than the surround.
- Metal frames: slimmer by construction, metal frames create a restrained outline that works particularly well for contemporary interiors and high-contrast photography.
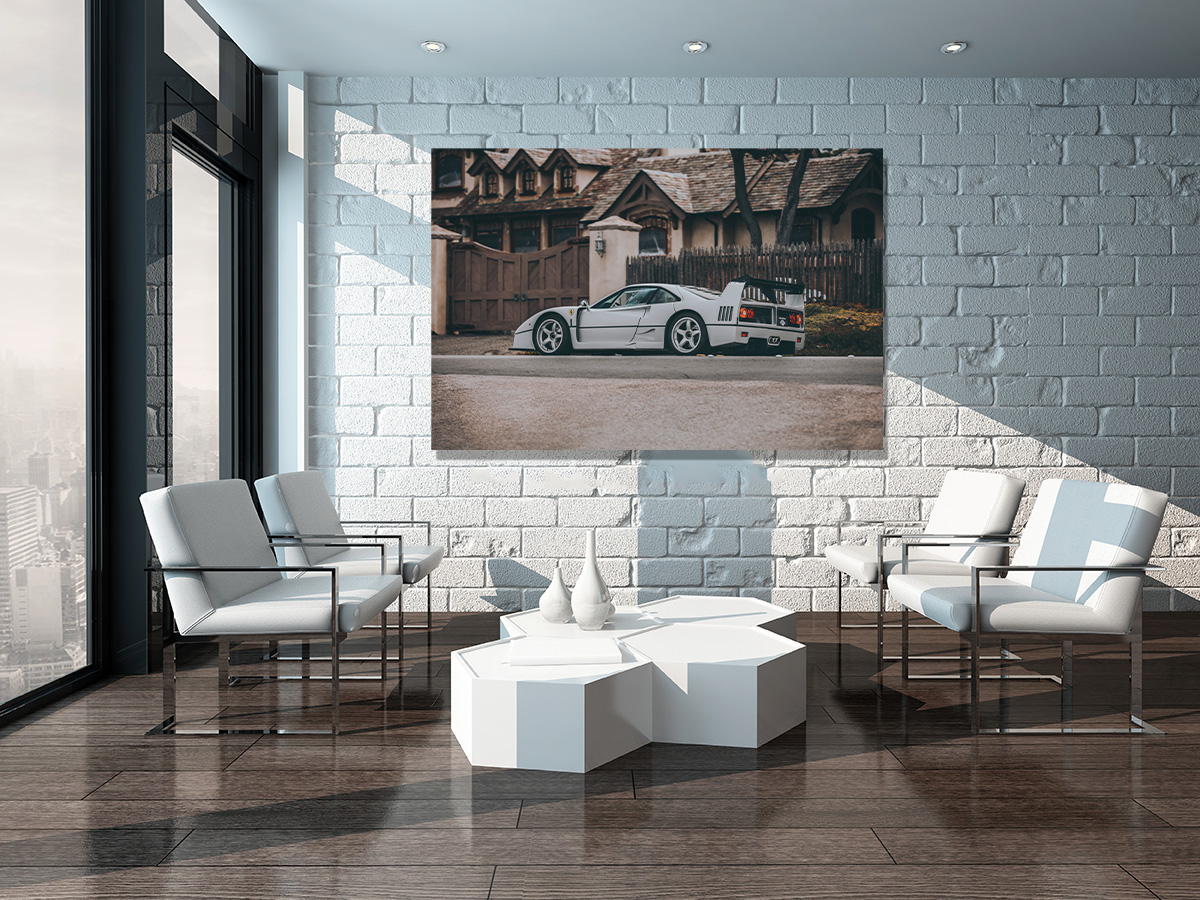
- Black frame: a black frame gives structure and emphasis, especially around light-toned artwork with generous white space, including automotive photographs set against pale backgrounds.
- Gallery frames: clean gallery frames in hardwood or brushed metal bring discipline to the presentation. They are often preferred for a large print because the profile stays quiet at scale.
Multiple mats, colored bevels, and ornate detailing can pull attention away from the image, particularly on oversized pieces where every visual decision is amplified.
Matting and glass options for framed large prints
Once the frame is chosen, matting becomes the next structural decision. A matted presentation uses acid-free board cut slightly larger than the image opening, creating a visual margin while keeping the surface separated from the glazing. That spacing is the detail that changes everything: it protects the print and gives the composition room to breathe.
Proportion matters here. The mat should sit evenly at the top and sides, with a slightly deeper lower margin when a signature or edition mark needs to remain visible. For conservation, the board, tape, and backing should all be acid-free, since inferior framing materials can discolor paper over time.
Beyond the frame, glazing affects both appearance and preservation. Glass is often preferred to acrylic for optical clarity, while acrylic remains useful when weight becomes a concern on a very large print. UV-filter glazing is appropriate for rooms with direct sunlight; in lower-light spaces, standard glazing may be sufficient if the rest of the mounting and backing are sound.
Direct contact between print and glazing should be avoided. In humid interiors, that contact can lead to sticking, surface disturbance, or moisture damage over time. A properly matted and professionally framed piece keeps a controlled gap between image and surface.
When to choose professional framing over DIY
A professional framer is worth considering when the artwork has financial value, archival importance, or lasting personal significance. Cars and Roses recommends professional framing for limited editions, collector photography, and any large print intended for long-term display.
By contrast, DIY framing can suit inexpensive works, temporary installations, or test displays. Even then, stable mounting, proper backing, and carefully selected frame components remain essential.
The difference lies in longevity. A trained framer can source conservation-grade board and mounting hardware, while advising on whether metal or hardwood gallery frames best suit the work. For a large print that must be securely framed and presented professionally, that expertise often proves decisive.
DIY and budget-friendly ways to frame large posters
Budget-minded display options for oversized work are broader than they once were. From a simple MDF build to retail photo frames and engineer-print services, practical solutions now cover many sizes and interiors, though each approach shifts the balance between cost, durability, and finish quality.
Step-by-step DIY frame construction for large prints
That balance becomes clearer in a home build. A dependable frame tutorial for how to frame large posters starts with two pieces of 1″ × 2″ primed MDF stacked to create a 2″-deep profile: no router required, just accurate measuring and a flat work surface.
Cutting dimensions matter. Add 1/8″ for wiggle room, then add 5/8″ on each side to account for the MDF thickness on each side of the print; before any cut is made, tape those measurements on the wall to confirm that the scale suits the room.
Once the pieces are ready, assemble the frame on a flat surface with wood glue at the mitered corners and 3 to 4 nails per corner, staggered on alternating sides. Reinforce each joint with 2″ corner brackets.
From there, the finish determines whether the build reads as temporary or resolved: the detail that changes everything. Fill each nail hole with spackle, sand with fine-grit orbital paper, then apply three coats of satin spray paint, allowing full drying time between coats.
The rear structure matters just as much. Attach bracing trim to the backing board with wood glue and finishing nails, driving the nail from the front so it grips properly into the board and gives the large print better support once hung.
Affordable retail and online framing alternatives
By contrast, when a DIY route is not the priority, the same format discipline applies. Knowing how to mount large prints without using a custom framer starts with format: pre-made frame options in 22″ × 28″ sizes cost far less than bespoke work while still giving a finished, orderly presentation.
Material tone affects the result. Retail photo frames in teak or natural wood often suit contemporary interiors more convincingly than standard black or white versions, and the difference lies in how the frame relates to the print rather than how much it costs.
Beyond the frame, digital files printed locally can reduce costs even further. For work under 36″ in height, standard print services are usually enough; above that, engineer-print or banner-print shops are better equipped for scale, and high-resolution source files remain essential because lost image quality cannot be restored after enlargement.
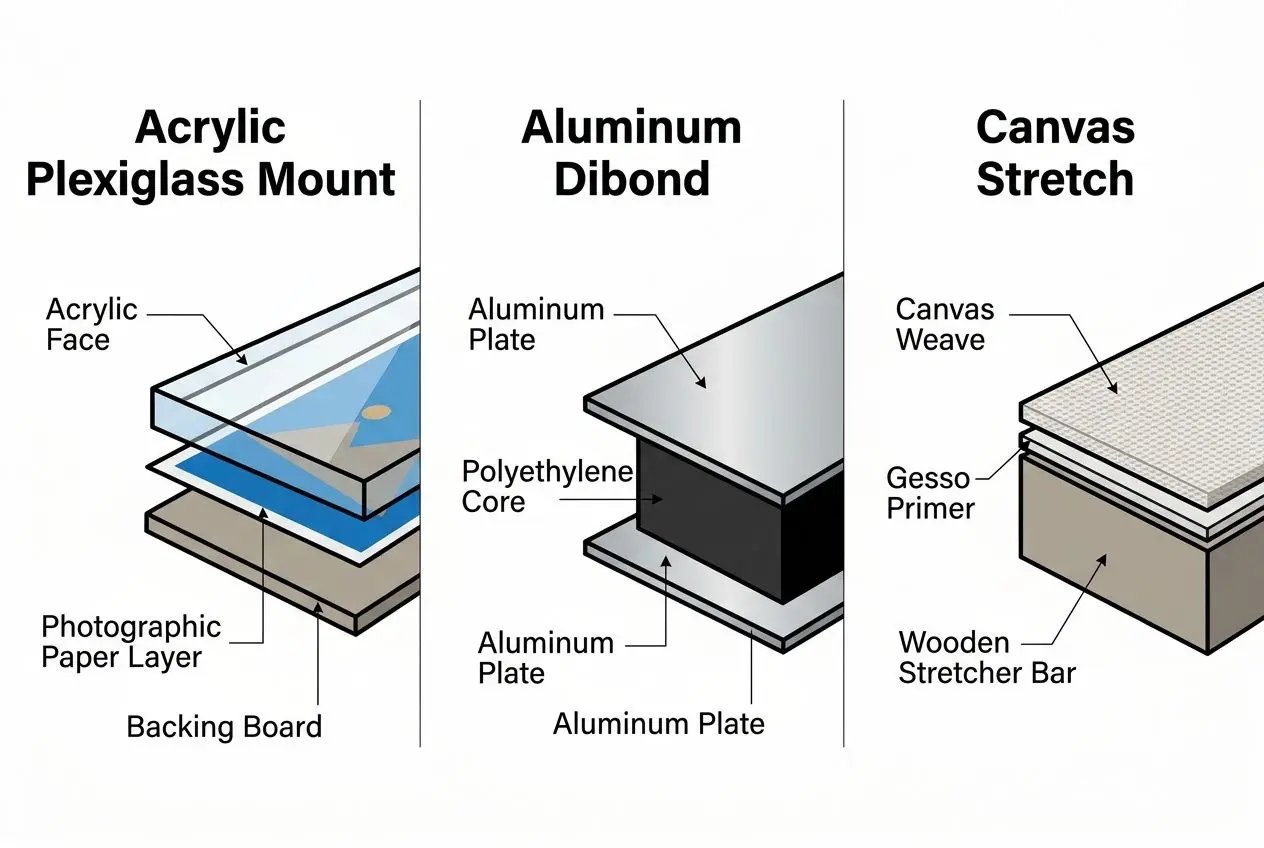
For oversized pieces, Cars and Roses recommends looking at ready-to-hang formats that remove traditional photo frames altogether: aluminum Dibond, acrylic glass, and matte large print framing solutions, including the canvas print, eliminate the shadow gap and hardware lines that a standard frame introduces.
A frameless acrylic presentation can outlast many budget builds; a standard frame remains the more flexible choice for those who expect to rotate the artwork.
| Method | Best suited for | Approximate cost range | Durability |
| DIY MDF frame build | Personal prints, posters, home decor | Low (materials only) | Medium, depends on build quality |
| Retail pre-made frame | Standard sizes, inexpensive prints | Low to medium | Medium |
| Engineer/banner print + retail frame | Oversized prints above 36″ | Low to medium | Medium |
| Professional custom framing | Limited edition, archival, valuable prints | High | High, conservation-grade |
| Aluminum Dibond / acrylic mount | Fine art, large format, frameless display | Medium to high | Very high, archival materials |
The right finish depends on whether the piece needs the lighter look of open display, the added clarity of acrylic, or the support of a rigid backing system for a large print that would otherwise flex inside the frame.
How to mount and hang large framed prints properly
Once the frame is chosen or built, mounting and hanging determine whether the result feels intentional. Large formats leave little room for approximation: hardware must match the weight, placement must respect the room’s natural focal points, and hanging height must suit the way the space is actually used.
Mounting methods including foam board and float mounting
Mounting method determines long-term stability before any other consideration. Foam board has clear limits at scale, and those limits matter before adhesive or paper choice is made: thin papers can ripple or warp when moisture-based adhesives are introduced, making surface stability the first factor to verify before committing to the method.
- Matted mounting: the most straightforward method. Archival framing tape secures the print behind the mat bevel, making this a practical choice for many large print formats with modest technical demands.
- Float mounting: the artwork is adhered to foam core board and spaced away from the glazing for a dimensional presentation. This type of mounting calls for professional handling and is best suited to fine art photographs printed on heavier paper.
- Frameless panel mounting: direct mounting to an aluminum Dibond backing with a polyethylene core helps prevent warping. Permanently elastic silicone systems also support long-term stability when acrylic glass is involved.
By contrast, a canvas print, framed canvas, or framed canvas print mounted on aluminum Dibond avoids many of the weaknesses associated with foam board. The backing adds rigidity across the full surface, which makes it particularly effective for a custom photo print, a large print, or framed photo prints intended for permanent display.
Hardware, hanging height, and wall placement for large prints
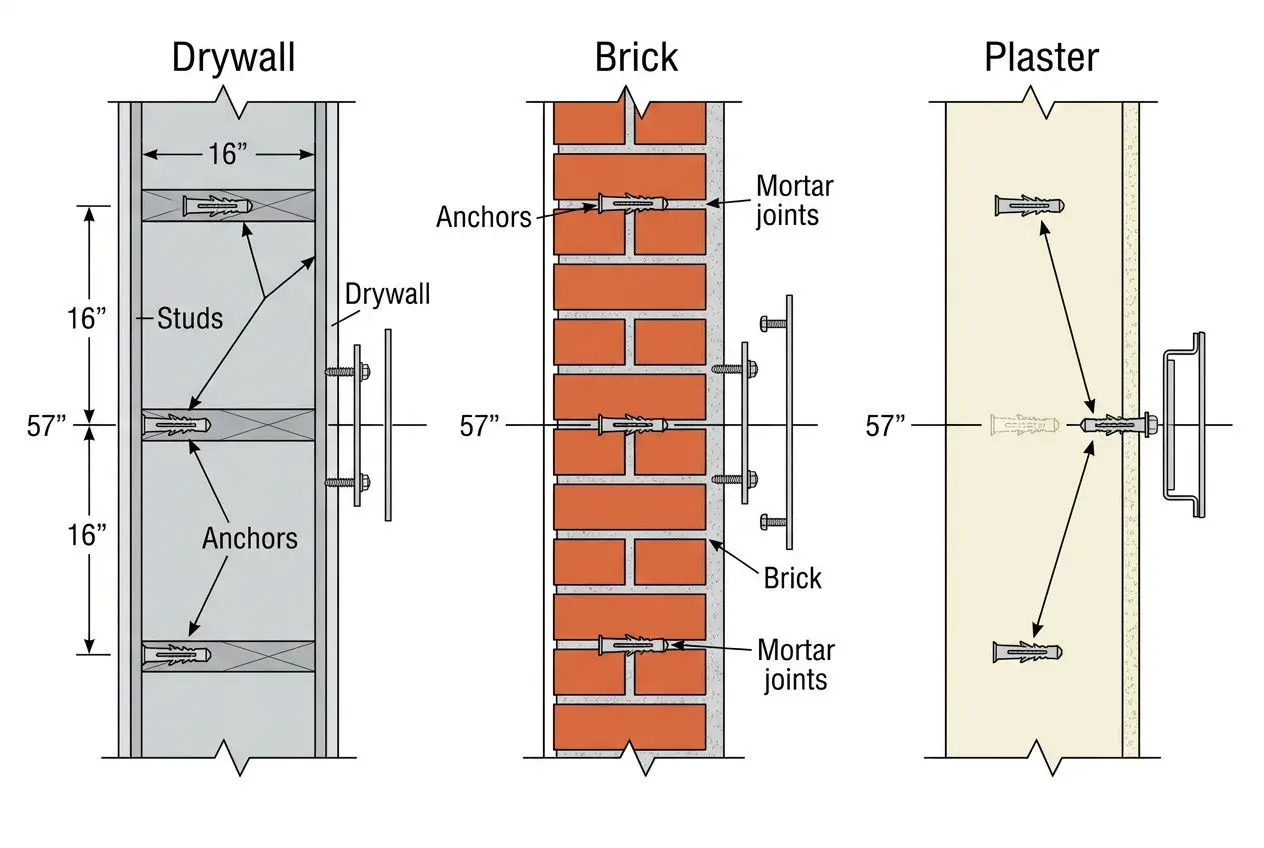
Once mounting is resolved, hardware becomes decisive. Choosing hanging hardware in proportion to the finished weight of the framed artwork is the first practical decision: for wall art prints over 50 pounds, French cleats fixed into studs remain the dependable solution, spreading the load across two interlocking strips, reducing point stress, and helping prevent sagging.
Lighter options have clear limits. Adhesive strips should be reserved for pieces under 15 pounds on smooth, clean walls, since dust and moisture weaken their hold quickly. Beyond 20 pounds, a nail fixed into structural support is the more reliable choice for hanging wall art safely.
From there, height matters just as much as hardware. The standard museum-style rule places the center of the artwork at 57 inches from the floor, roughly at standing eye level. To calculate the exact hanging point, divide the artwork height by two, subtract the hardware drop, then add 57 inches; in dining areas, lower that center by 8 to 12 inches for seated viewing.
Before drilling, test the composition with a painter’s tape template. Above a sofa or console, the wall art should span roughly two-thirds of the furniture’s width, keeping the frame visually tied to the room rather than floating apart from it. Beyond the frame, placement against doors, moldings, and architectural lines is often the detail that changes everything.
Choosing the right finish and size for framed wall art
Once placement is resolved, finish becomes the next material decision. The right finish depends on the light in the room: canvas softens reflection through its textured surface, while matte treatments help preserve legibility in bright spaces. Acrylic, by contrast, intensifies color and brightness, making it suitable where reflection supports the image rather than interrupting it.
A framed canvas print generally suits rooms with soft natural light, and placing it opposite large windows can help limit UV reflection. Aluminum surfaces reflect light more evenly and tend to perform better in controlled artificial lighting. The difference lies in how the surface carries the image after hanging, not simply how it appears in a sample corner.
Cars and Roses offers five standard large formats: 60×40, 90×60, 120×80, 150×100, and 180×120 centimeters. At 180×120 cm, the scale sets the atmosphere of the room and calls for robust mounting near architectural lines or entry focal points. For guidance on display, see large print framing.
A photograph earns its place when size, surface, backing, and hanging position work together, whether the result is matted, framed, or presented as a framed canvas print. For an example of oversized framed wall art and wall art prints with multiple finish options, including acrylic and canvas, see framing large prints.
Frequently asked questions
What is the 2/3 rule for wall art?
The 2/3 rule sets a clear proportion: the artwork should measure about two-thirds the width of the furniture placed beneath it. For a sofa that is 200 cm wide, a framed print, framed canvas, or other wall art around 130 cm wide usually holds the composition in balance.
Above a headboard or fireplace mantel, the same ratio applies: a print spanning roughly two-thirds of the mantel width holds without competing with the architectural surround.
Can I frame a very large print at home without professional equipment?
Yes, for certain projects. Stacking two pieces of 1″ × 2″ primed MDF can create a sturdy 2″ deep frame profile without routing tools, which makes this approach suitable for posters, personal photography, or straightforward artwork intended for display rather than long-term conservation.
That said, the difference lies in what the piece requires over time. For a limited edition print or any framed work with archival value, Cars and Roses recommends professional framing materials: UV-filter glazing, acid-free backing, stable mounting, and a rigid board support that protects the framed print from moisture, dust, and light exposure.
How do I choose between canvas, aluminum, and acrylic glass for a large print?
The right finish depends on light first. A canvas print softens reflection and suits rooms with gentle natural illumination, while aluminum handles artificial lighting with a more even surface response.
From there, acrylic offers a different register: a glossy 2 mm surface that intensifies contrast and color, especially in photographic wall art shown under directed light. This is worth considering when the image depends on precision and depth rather than texture alone.
Once installed, support matters as much as appearance. A framed canvas or framed acrylic piece benefits from secure backing, a stable board, and dependable mounting; on larger formats, aluminum Dibond helps prevent warping, while an elastic silicone system improves the durability of acrylic combinations.
Sorry, the comment form is closed at this time.