Mastering the art of car photography means learning how to blend lighting, composition, and camera settings to create truly captivating automotive images. Whether you’re photographing your own car or building a professional portfolio, these car photography tips will guide you toward success. This guide covers essential lighting techniques, post-processing methods, and creative strategies that can elevate your automotive photography.
Car photography tips every beginner needs before shooting
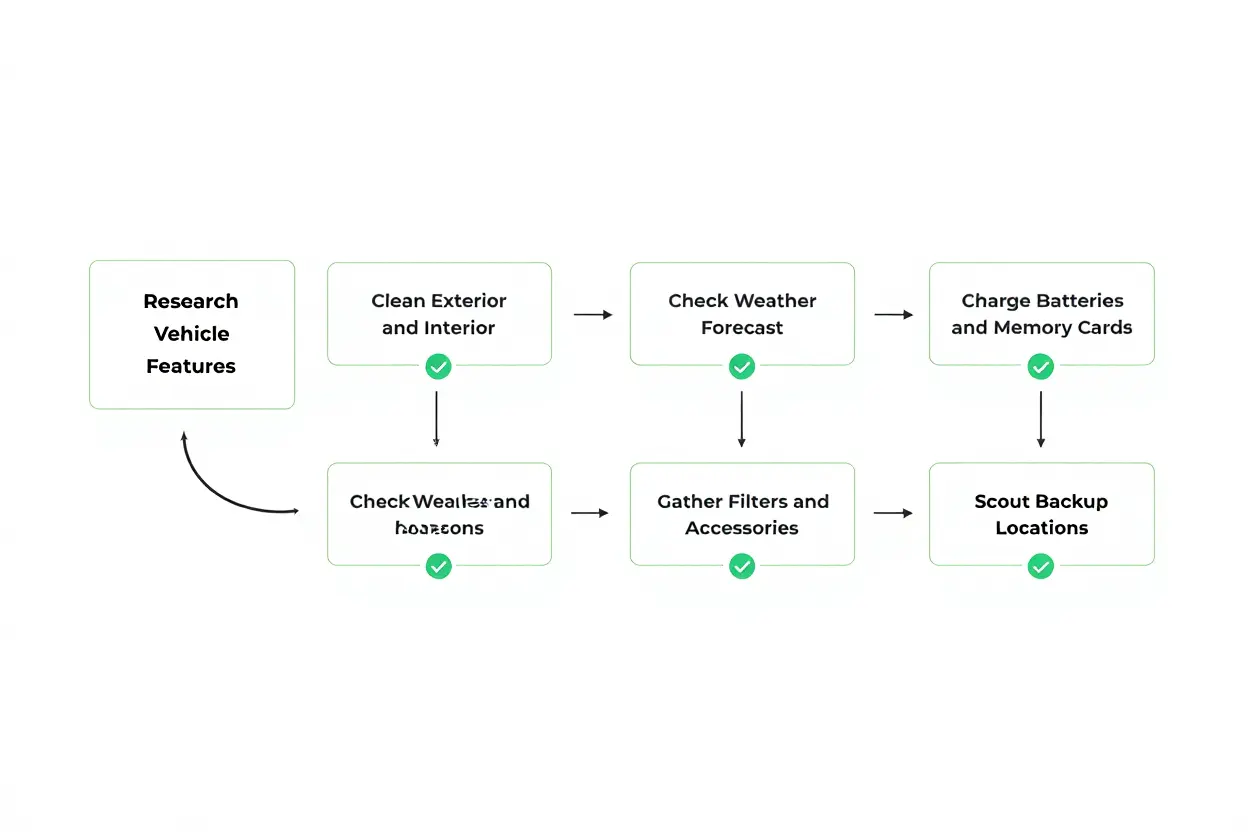
Thorough preparation is essential before you even pick up your camera. Research your specific subject to identify its standout design elements, like iconic wheel arches or a unique grille. This extra attention to detail ensures your final images highlight what makes the vehicle truly special.
Pre-shoot preparation and gear essentials
Always start your session with a clean, well-presented vehicle. A pristine exterior is one of the most fundamental car photography tips for a home setup, as it ensures beautiful, distraction-free shots. It keeps the viewer’s focus on the car’s sleek details without any visual clutter.
- Weather and timing: Plan your sessions for golden hour when the natural light is soft and flattering. These lighting conditions help minimize harsh reflections and make your workflow much smoother.
- Battery and storage management: Fully charge all your batteries and bring spares. Always make sure you have enough memory card space before you head out for the shoot.
- Essential filter kit: Bring a polarizing filter to handle bright glare and reflections. A remote trigger helps avoid camera shake, and a reflector can be incredibly useful for managing light.
- Permission and location access: Always get the owner’s permission before photographing a car. Attending local car events is another great way to find amazing vehicles you can shoot legally.
Create a detailed pre-shoot checklist that includes permits, weather checks, battery status, and backup location options. Good planning helps you avoid surprises and lets you shoot with confidence.
Choosing the right camera settings at home
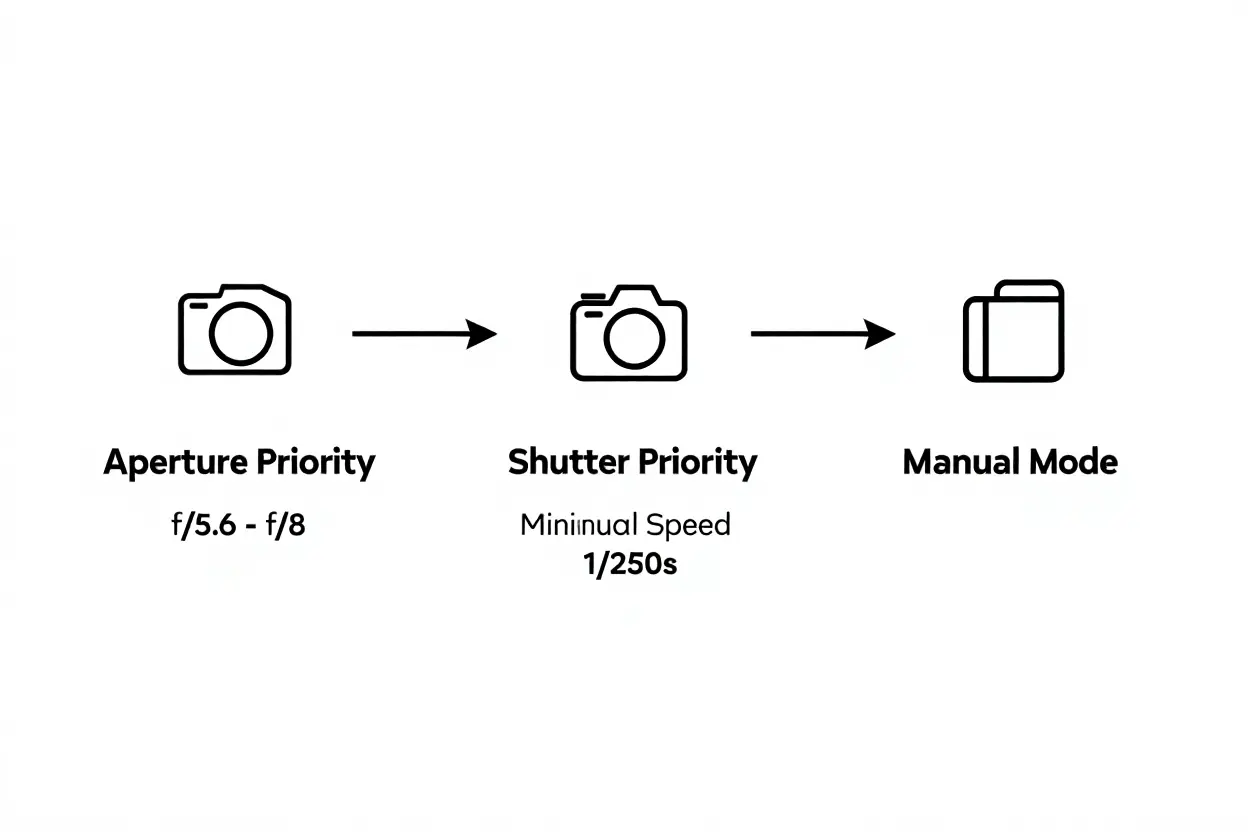
When diving into car photography for beginners, getting to know your camera’s basic modes is a must. Start with Aperture Priority for stationary cars, which lets you control depth of field while the camera picks the right shutter speed for proper exposure.
Use an aperture between f/5.6 and f/8 to keep the entire car in sharp focus. If you want to isolate a specific feature like a badge, open up to a wider aperture like f/1.8 to create a soft, blurred background. Keep your ISO low to prevent digital noise from affecting image quality.
Why RAW format changes everything for beginners
Shooting in RAW format from the very beginning is a game-changer. RAW files preserve the most image data, giving you maximum flexibility during post-processing. You can adjust exposure, white balance, and more without losing quality.
Unlike compressed JPEGs, RAW files retain crucial detail in both shadows and highlights. This is especially useful when dealing with reflective surfaces and bright chrome. Recovering highlight details is key to creating professional-looking final edits.
Modern cameras with continuous shooting and reliable autofocus are a great starting point. Pair your camera with a sharp 50mm lens to capture crisp details with minimal distortion, making it a complete kit for any new automotive photography enthusiast.
Mastering Light for Stunning Car Photography Results
Cars & Roses — Fine Art Photography
Car Photography Fine Art Prints
See automotive photography at its finest — printed on museum-quality archival paper. From €78.
Mastering lighting is the very foundation of compelling car photography. Understanding how to position and manipulate light turns ordinary shots into professional, print-worthy images. These techniques will captivate your audience and elegantly showcase the vehicle’s design.
Golden Hour Positioning and Angle Strategies
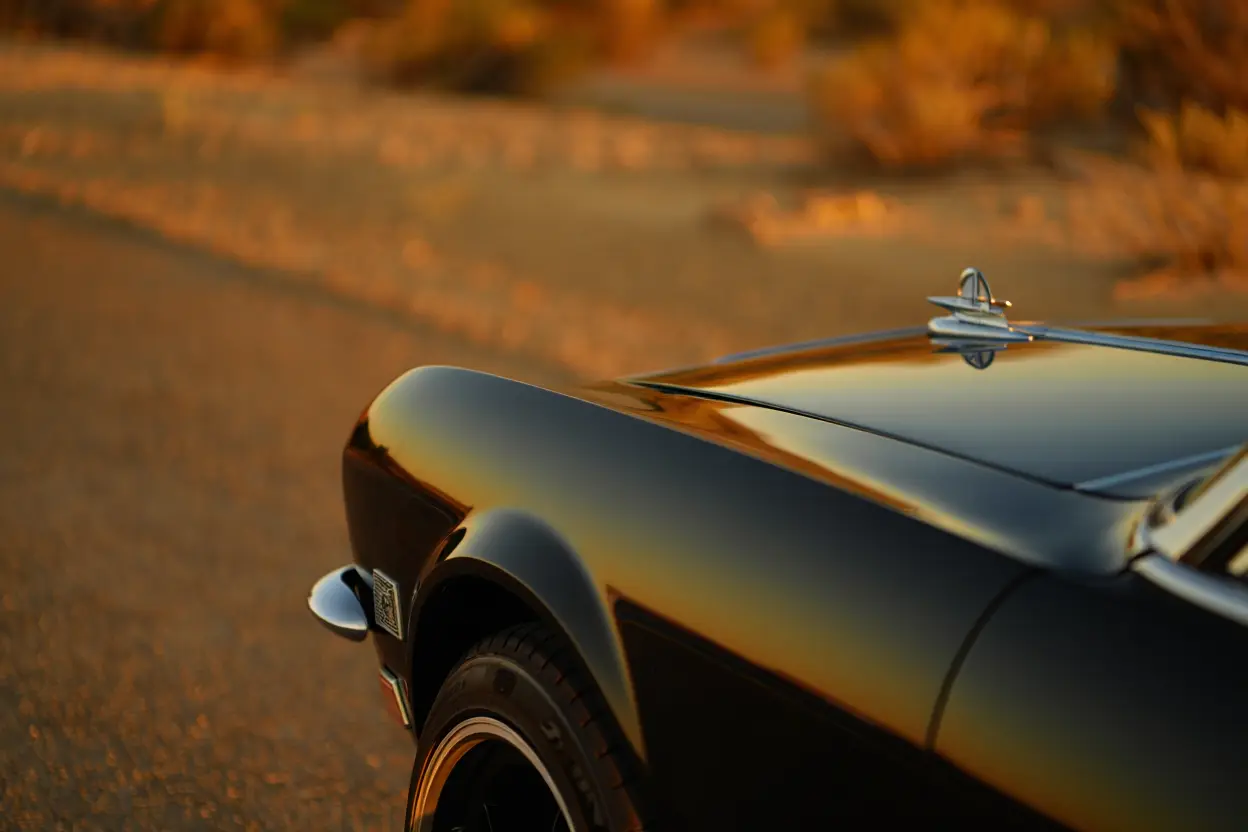
Golden hour car photography provides warm illumination that beautifully wraps around a car’s curves. Experiment with angles relative to the sun to capture side-lighting, which can emphasize delicate chrome details. This natural car photography lighting technique creates a depth of field and richness that is hard to achieve under the harsh midday sun.
Managing Reflections with Filters and Diffusers
A circular polarizing filter is essential for controlling reflections on glass and glossy paint. Rotate the filter until glare diminishes, which also deepens the sky and boosts color saturation. This simple adjustment can instantly improve your entire composition.
- Overcast skies as natural softboxes: Cloudy days diffuse light evenly across the car, simplifying glare control and producing soft, even illumination.
- 45-degree light positioning: Indoors, position large softboxes at sharp angles to spread light evenly and avoid harsh shadows on chrome and wheels.
- Neutral density filters for bright conditions: ND filters reduce light intake, allowing for wider aperturesideal for shallow depth of fieldand slower shutter speeds in bright light.
- Reflector panels for fill light: Place reflectors opposite your key light to bounce brightness into shadows, adding dimension to the car’s surfaces.
Avoid shooting in direct midday sun, which causes extreme contrast and unflattering shadowsespecially in wheel wellsand can lead to blown-out highlights that are difficult to correct in post-processing. If you must shoot at midday, use a shaded background or diffusion panels to soften the harsh light.
Night and Indoor Car Photography Lighting Techniques
At night, use available streetlights or controlled spotlights to isolate the car in your frame. Set a low ISO, mount your camera on a tripod, and use a long exposure to capture rich colors and fine details without introducing noise.
Sunrise light casts dramatic shadows that accentuate a car’s sculptural lines. Position the vehicle so light strikes it from one side, creating contrast that distinguishes reflective and matte surfaces for a powerful visual impact.
Car Photography Angles and Composition Ideas That Work
Cars & Roses — Fine Art Photography
Sports Car Photography — Fine Art
Racing legends and modern supercars, captured and printed to perfection.
The angles you choose significantly influence the vehicle’s perceived character, elegance, and raw power. Mastering distinctive perspectives allows you to tell a compelling story about your subject and highlight its most flattering features for truly exceptional car photography.
Low Angles and Three-Quarter Views Explained
Shooting from a low angle near the ground provides one of the most effective car photography angles. This technique emphasizes the car’s stance, makes the wheels appear larger, and dramatically showcases its muscular body lines. Simply crouching or kneeling near the vehicle’s beltline lets you capture this powerful perspective with ease.
The classic three-quarter front view, taken from about 45 degrees off the nose, remains incredibly flattering. It beautifully presents the front fascia, the hood’s profile, and one complete side of the vehicle, creating a perfectly balanced composition in a single, striking frame.
Creative Car Photoshoot Ideas Using Environment and Framing
For genuinely creative car photoshoot ideas, incorporate environmental elements that enhance rather than distract from your subject. You can frame the car using foreground features like tree branches or stone walls, which add depth and create a clear narrative context with multiple visual layers.
Apply the Rule of Thirds by positioning the vehicle at an intersection point rather than directly in the center. This approach creates dynamic, visually appealing scenes while leaving enough breathing room for environmental storytelling. Using negative space intentionally can suggest freedom and allow the landscape to complement the car seamlessly.
Detail Shots and Close-Up Composition Strategies
Capture tight detail shots of specific features, such as stitched leather interiors or illuminated dashboard instruments. Use a low ISO setting and wide aperture to isolate your subject with a soft, blurry background. For inspiration, explore top car photography Instagram accounts to discover fresh styles.
Use leading lines from the surroundingslike road markings or curved wallsto naturally guide the viewer’s eye toward the car. These subtle cues pull attention toward your subject while adding depth and perspective. Elevated viewpoints, whether from a drone or high ground, can also reveal stunning graphic patterns that are otherwise invisible.
Camera Settings and Motion Techniques for Car Photography
A solid grasp of exposure fundamentals unlocks a wide range of creative options for your automotive photography. By mastering these techniques, you can either freeze fast-moving car photography motion or introduce smooth, intentional motion blur. This allows you to capture vehicles in a way that communicates their dynamic energy and impressive power.
Aperture, Shutter Speed, and ISO Explained Simply
When photographing stationary cars, Aperture Priority mode gives you direct command over your focus and depth of field. These settings are key for isolating your subject and ensuring it stands out from the background. Try f/5.6–f/8 to keep the entire car sharp, or widen to f/1.8–f/2.8 for a beautiful background blur.
For moving vehicles, switch to Shutter Priority mode and set a shutter speed starting at 1/250s. For fast-paced track action, bump it up to 1/500s or higher to freeze the motion cleanly. Always aim to keep your ISO as low as possible to avoid digital noise on reflective car surfaces.
Delving into high-speed photography often requires cameras that shoot at high frames per second. Using extremely fast shutter speeds combined with powerful strobes lets you freeze high-speed motion with precision. These camera settings for car photography help you get sharp, clear shots of fast-moving vehicles with no blur.
| Situation | Aperture | Shutter Speed | ISO |
| Stationary car, golden hour | f/5.6–f/8 | 1/125–1/250s | 100–200 |
| Moving car, track action | f/8–f/11 | 1/500s or faster | 400–800 |
| Panning sequence | f/8 | 1/60–1/125s | 100–400 |
| Detail isolation | f/1.8–f/2.8 | 1/1000s or faster | 100–400 |
| Night light trails | f/4–f/8 | 5–30s | 100–200 |
For long exposure shots, enable mirror lock-up or use an electronic front-curtain shutter. Mount your camera securely on a steady tripod to reduce vibrations caused by the mirror’s movement. This simple step prevents slight blurring that could otherwise soften fine details in your subject.
Panning Technique for Dynamic Car Light Blur
The panning technique involves tracking a moving car with your camera while using a slower shutter speed. By doing this, you keep the vehicle crisp while blurring the background into a dynamic streak. Work on maintaining fluid camera motion to keep the car centered in your frame throughout the shot.
Begin practicing with slower-moving cars before tackling fast-moving subjects on the open road. Concentrate on tracking the car smoothly rather than trying to catch up suddenly. This advanced car photography method delivers impressive results that highlight your automotive photography expertise.
Long Exposure and Night Light Trails Step by Step
Create striking long exposure images with dramatic light trails by setting a low ISO. Mount your camera on a sturdy tripod to keep it stable, and use exposure times between 5 and 30 seconds. A steady tripod is critical for maintaining image sharpness and controlling light throughout long exposures.
Always scout your location during daylight to find your best shot setup and ideal composition. Choose an angle that captures both the car’s movement and the surrounding scene. Use a remote release or self-timer to prevent any camera shake when you take the shot.
A neutral density filter offers significant creative freedom by cutting down the amount of light entering your lens. It enables you to use both wider apertures and slower shutter speeds without overexposing the shot. Play around with different exposure lengths to capture vivid streaks that emphasize speed and motion.
Post-processing and printing car photography like a pro
Transforming your raw files into impressive gallery prints requires mastering a few essential post-processing techniques. Your editing workflow is what truly distinguishes amateur snapshots from professional-grade car images, making these skills absolutely vital.
Editing workflow from RAW to gallery-ready image
Begin your car photography post-processing by fine-tuning the white balance to reflect the actual lighting conditions. Warm up the scene if you shot during golden hour, or cool it down for an overcast background. Then, apply subtle contrast curves to enhance textures without sacrificing fine details in the shadows.
- Dodging and burning techniques: Brighten reflective surfaces like chrome trim and deepen shadows to simulate studio lighting in an outdoor environment.
- Clone and Healing tools: Clean up any distracting reflections, dust spots, or background elements to create a polished, gallery-ready finish.
- Selective clarity and texture: Enhance the definition of body panels and surface textures carefullyjust enough to make the subject stand out without appearing artificial.
Always shoot in RAW format to preserve the fullest tonal range and maximize flexibility during editing. This rich data allows for far more effective post-processing than compressed files ever could.
Black and white car photography techniques and tips
Removing color shifts the focus to form and texturea core concept in black and white car photography, highlighting the vehicle’s sculptural lines and tactile surfaces. This timeless approach works beautifully with classic sports cars, emphasizing elegant geometry rather than bold paintwork.
When converting to monochrome, refine your use of contrast curves and boost clarity selectively on specific panels. Use dodging and burning to deepen shadows and add subtle grain for an authentic, timeless automotive photography look.
Shooting in RAW is especially critical for monochrome work, as it enables you to retain the tonal depth essential for beautiful conversions. This level of detail gives you exceptional creative freedom throughout the editing phase.
Choosing the right print material for car photography
The print medium you select dramatically affects how viewers perceive your final car photography. Opting for premium, museum-quality materials elevates casual captures into serious pieces of art.
- Fine-art matte paper: Archival matte surfaces reduce glare and highlight smooth tonal transitions, making them ideal for classic subject matter.
- Aluminum and acrylic prints: These frameless modern options deliver vibrant colors and high visual impactexcellent for dramatic car images.
- Canvas with linen texture: Stretched canvas evokes a classic, artisanal feel, perfect for vintage cars and wide scenic backgrounds.
- Custom framing options: Frameless aluminum complements contemporary interiors, while floating frames offer collectors a more traditional fine-art presentation.
Large-format prints emphasize the incredible depth and technical precision achieved through advanced equipment, lighting, and composition choices. Building a diverse portfolio with these materials can attract both commercial clients and dedicated print collectors.
Frequently Asked Questions
What camera equipment do you need to start photographing cars?
To begin your journey into automotive photography, you’ll need a solid foundation of equipment. A mirrorless or DSLR camera with fast burst rates and an accurate focus system is key. For your lens, opt for a versatile 50-85mm focal length. A robust tripod is essential for sharp, stable shots, and a polarizing filter will be your best friend for managing reflections. Don’t forget a remote shutter release and extra batteries for longer shoots.
How do you eliminate reflections and glare when shooting cars?
When photographing cars, controlling reflections is a top priority. The most effective tool is a circular polarizing filter, which dramatically cuts down glare on paint and glass. Experiment with angles; positioning your main light source at a 45-degree angle often highlights the car’s lines while avoiding harsh reflections. Overcast days are ideal because the cloud cover acts as a natural softbox, eliminating bright hotspots and simplifying your shooting process.
What is the best time of day for car photography?
For the best results in car photography, shoot during the golden hoursjust after sunrise or just before sunset. This soft, warm light enhances the vehicle’s shape and paint color beautifully. Overcast days are also excellent, as the even, diffused light prevents harsh shadows and strong reflections on the bodywork. The harsh, direct light of midday should be avoided, as it creates unflattering shadows that are difficult to fix in editing later on.
Cars & Roses
Discover Our Collections
Prestige
Porsche Collection
Fine Art Prints
Automotive
Sports Cars
Fine Art Prints
Landscape
Landscapes
Fine Art Prints
Museum-quality archival prints — from €78 — worldwide shipping